|
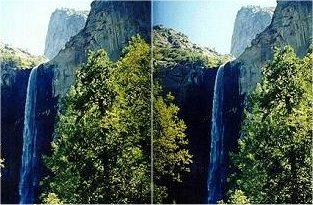
These instructions are for making stereographs from two 3x5 inch
photographs like the one above
Introduction: A 3-Dimensional ("stereoscopic") photograph is made from
two slightly different views of the same scene. These two views are fused
together by the 3-D VIEWMAX stereo-viewer. Your camera has only ONE
eye, so your pictures appear flat, with only the two dimensions of height
and width. These instructions will teach you how to give your camera TWO
eyes. With two eyes, your camera sees what you see, and when the resulting
two photographs are mounted side by side, you will be able to look through
the stereo-viewer and see one picture in real, natural 3-D. The stereographs
you will make will be sharper, and bigger than antique stereographs, and
they will be in color. From the moment you look into the viewer and see
your first stereograph, you will never look at photography the same way
again.
INSTRUCTIONS
You can use a single use ( disposable) camera or any other camera. If you
use a 35 mm SLR, use a 50 mm or "normal angle lens". The camera must
be in the vertical position vertical position because a horizontal format
would be too wide. Stand the camera on its end in the vertical position,
on a flat, sturdy surface. You will be taking two pictures, 3 inches apart.
TAKE TWO PICTURES
Take the first picture of any stationary object or scene, and then slide
the camera over to the right 3 inches and take the second picture. You
don't even have to look through the camera viewfinder in the second shot.
Just make sure you slide the camera straight over. (You can draw a line,
or glue a ruler on the flat surface to insure that the camera is moved
the proper distance, and slides straight.) A small table can act as your
surface. You can photograph people, if you can get them to hold still.
If you need to tilt the camera up or down, tilt the table instead, because
one camera shot mustn't be tilted differently than the other.
PROCESSING THE PRINTS
Your first photograph is the "left view", and the second photograph is
the "right view". Keep track of which is which. When you get the film developed,
get the 3x5' print size. 4x6" prints are too wide, even in the vertical
format. Order matte prints for less glare.
MAKING THE STEREOGRAPHS
To make a stereograph from the two prints, tape the left and right views
together down the middle, on the back, making sure that when viewed, the
left view is on the left, and the right view is on the right. The stereo
pairs can also be mounted side by side on cardboard with a photo spray
glue. If you mount the prints onto cardboard, leave no border at the bottom,
as the image should be touching the bottom of the 3-D VIEWMAX
stereo-viewer.
VIEWING YOUR STEREOGRAPHS
You can view your stereographs in antique stereoscopes.
HYPER STEREO
As an experiment in hyper stereo, you can separate the two camera positions
about 2 or 3 feet instead of the normal 3 inches, and shoot into a valley,
or other objects at a distance. (Make sure there are no objects in the
foreground when shooting hyper stereo or they won't converge when viewed).
A hyper stereo stereograph will show depth in far away objects that normally
isn't seen.
HOME
.
|